시작하기에 앞서

예전부터 즐겨보는 유튜브 채널 중에 devaslife라는 유튜버가 있습니다. VIM으로 풀스택 개발을 하는 동영상을 주로 올리는데 최근에 봤던 How I built a software agency wesite with Next.js + Tailwind CSS (in nature)에서 CSS 애니메이션 없이 자바스크립트 만으로 이미지 슬라이더를 개발하는 것을 보고 한 번 따라서 개발해보고 싶은 마음이 생겨 개발을 진행하였습니다.
결과물
위와 같이 body의 크기가 특정 width보다 작아지는 경우에는 이미지가 좌측으로 움직이도록 하고, 아닐 경우에는 애니메이션을 보여주지 않도록 개발을 진행하겠습니다.
개발
프로젝트 구조 및 사용한 라이브러리
1
2
3
4
5
6
7
8
src
├───hooks
│       useAnimationFrame.ts
│       useWindowSize.ts
│
└───components
        slide.tsx
        slider.tsx
- styled-component
useAnimationFrame.ts
1
2
3
4
5
6
7
8
9
10
11
12
13
14
15
16
17
18
19
20
21
22
23
import { useCallback, useEffect, useRef } from "react";

const useAnimationFrame = (enabled: boolean, callback: () => void) => {
  const requestRef = useRef<ReturnType<typeof requestAnimationFrame>>();

  const animate = useCallback(() => {
    callback();
    requestRef.current = requestAnimationFrame(animate);
  }, [callback]);

  useEffect(() => {
    if (enabled) {
      requestRef.current = requestAnimationFrame(animate);
      return () => {
        if (requestRef.current) {
          return cancelAnimationFrame(requestRef.current);
        }
      };
    }
  }, [enabled, animate]);
};

export default useAnimationFrame;
requestAnimationFrame을 사용하기 위한 훅을 개발합니다. 인자로 넘어온 enabled가 참일 때만 게속 callback() 함수를 실행하하 아닐 경우에는 아무 동작도 하지 않습니다.
useWindowSize.ts
1
2
3
4
5
6
7
8
9
10
11
12
13
14
15
16
17
18
19
20
21
22
23
24
25
26
27
import { useEffect, useState } from "react";

const useWindowSize = () => {
  const [windowSize, setWindowSize] = useState({
    width: window.innerWidth,
    height: window.innerHeight,
  });

  useEffect(() => {
    const handleResize = () => {
      setWindowSize({
        width: window.innerWidth,
        height: window.innerHeight,
      });
    };

    window.addEventListener("resize", handleResize);

    return () => {
      window.removeEventListener("resize", handleResize);
    };
  }, []);

  return windowSize;
};

export default useWindowSize;
useWindowSize 훅은 현재 화면의 width와 height를 가져올 수 있도록 합니다.
slide.tsx
1
2
3
4
5
6
7
8
9
10
11
12
13
14
15
16
17
18
import React from "react";

export type LogoSlideProps = {
  src: string;
};

const Slide = ({ src }: LogoSlideProps) => {
  return (
    <img
      alt={src}
      src={src}
      height={100}
      style={{ margin: "0px 8px" }}
    />
  );
};

export default Slide;
slide.tsx에서는 슬라이더 내부에 들어갈 이미지를 관리합니다.
slider.tsx
1
2
3
4
5
6
7
8
9
10
11
12
13
14
15
16
17
18
19
20
21
22
23
24
25
26
27
28
29
30
31
32
33
34
35
36
37
38
39
40
41
42
43
44
45
46
47
48
49
50
51
52
53
54
55
56
57
58
59
60
61
62
63
64
65
66
67
68
69
70
71
72
73
74
75
76
77
78
79
80
81
82
83
84
85
86
87
88
89
90
91
92
93
94
import styled from "@emotion/styled";
import React, { useCallback, useEffect, useRef, useState } from "react";
import useAnimationFrame from "../hooks/use-animation-frame";
import useWindowSize from "../hooks/use-window-size";
import Slide, { LOGO_MARGIN_WIDTH } from "./logo-slide";

const SliderContainer = styled.div`
  overflow: hidden;
`;

const SliderArea = styled.div`
  display: flex;
`;

const LogoArea = styled.div`
  display: flex;
`;

export type LogoSliderProps = {
  logos: string[];
};

const Slider = ({ logos }: LogoSliderProps) => {
  const refSliderContainer = useRef<HTMLDivElement>(null);
  const refItemArea = useRef<HTMLDivElement>(null);
  const refScrollX = useRef<number>(0);

  const windowSize = useWindowSize();

  const [enabled, setEnabled] = useState<boolean>(false);

  useEffect(() => {
    let cancelled = false;
    const { current: sContent } = refItemArea;
    const getWidth = () => {
      if (
        !sContent ||
        sContent.clientWidth === logos.length * LOGO_MARGIN_WIDTH * 2
      ) {
        if (!cancelled) {
          requestAnimationFrame(getWidth);
        }
      } else {
        setEnabled(windowSize.width < sContent.clientWidth);
      }
    };
    getWidth();
    return () => {
      cancelled = true;
    };
  }, [logos.length, windowSize]);

  useAnimationFrame(
    enabled,
    useCallback(() => {
      const { current: sContainer } = refSliderContainer;
      const { current: sContent } = refItemArea;

      if (sContainer && sContent) {
        refScrollX.current += 0.5;
        sContainer.scrollLeft = refScrollX.current;

        if (sContainer.scrollLeft >= sContent.clientWidth) {
          refScrollX.current = 0;
          sContainer.scrollLeft = 0;
        }
      }
    }, []),
  );

  return (
    <SliderContainer ref={refSliderContainer}>
      <SliderArea
        className="logo-slider"
        style=
      >
        <LogoArea ref={refItemArea}>
          {logos.map((src) => (
            <Slide key={`${src}-main`} src={src} />
          ))}
        </LogoArea>
        {enabled ? (
          <LogoArea style=>
            {logos.map((src) => (
              <Slide key={`${src}-append`} src={src} />
            ))}
          </LogoArea>
        ) : null}
      </SliderArea>
    </SliderContainer>
  );
};

export default Slider;
styled-component를 통해서 간략하게 꾸미고 자동 스크롤을 구현하였습니다. 스크롤 로직은 다음과 같습니다.
1
2
3
4
5
6
7
  const refSliderContainer = useRef<HTMLDivElement>(null);
  const refItemArea = useRef<HTMLDivElement>(null);
  const refScrollX = useRef<number>(0);

  const windowSize = useWindowSize();

  const [enabled, setEnabled] = useState<boolean>(false);
- refSliderContainer: 스크롤을 담당하는 컴포넌트의 최상단 부분을 참조해야 하므로
useRef로 값을 불러옵니다. - refItemArea: 실제로 자동으로 스크롤이 될 부분 중 진짜 이미지를 갖고 있는 부분을 의미합니다. 진짜 이미지의 의미는 잠시 후에 설명드리겠습니다.
- refScrollX: 스크롤이 X축 방향으로 얼마나 움직였는지를 의미합니다.
- windowSize: 아까 저희가 만든
useWindowSize훅을 통해서width값을 가져오기 위해서 사용될 예정입니다. - enabled: 화면의 크기에 따라서 슬라이드 애니메이션이 나오잖아요? 만약에 enabled 되면 슬라이드 애니메이션을 보여주고 아닐 경우에는 보여주지 않습니다.
1
2
3
4
5
6
7
8
9
10
11
12
13
14
15
16
17
18
19
20
  useEffect(() => {
    let cancelled = false;
    const { current: sContent } = refItemArea;
    const getWidth = () => {
      if (
        !sContent ||
        sContent.clientWidth === logos.length * LOGO_MARGIN_WIDTH * 2
      ) {
        if (!cancelled) {
          requestAnimationFrame(getWidth);
        }
      } else {
        setEnabled(windowSize.width < sContent.clientWidth);
      }
    };
    getWidth();
    return () => {
      cancelled = true;
    };
  }, [logos.length, windowSize]);
이미지는 useEffect 내부에 useRef를 통해서 width, height의 값을 불러올 경우 컴포넌트가 랜더링 된 이후에 이미지가 로딩이 되므로 크기가 제대로 출력이 안 될 수 있습니다. 이 때문에, 로고(이미지) 개수 * Margin값 * 2를 통해서 이미지가 하나도 불러오지 않았을 때의 길이가 현재 refItemArea의 길이와 동일하거나 useRef를 통해서 값을 제대로 참조하지 못할 경우에는 이를 게속 반복하게 합니다. 그리고 만약에 이미지가 성공적으로 불러와졌으면 현재 화면의 가로 길이가 모든 이미지의 가로 길이 + 마진 값 (즉 ItemArea의 가로 길이)보다 작은지 큰지를 enabled에 넣어줍니다.
1
2
3
4
5
6
7
8
9
10
11
12
13
14
15
16
17
  useAnimationFrame(
    enabled,
    useCallback(() => {
      const { current: sContainer } = refSliderContainer;
      const { current: sContent } = refItemArea;

      if (sContainer && sContent) {
        refScrollX.current += 0.5;
        sContainer.scrollLeft = refScrollX.current;

        if (sContainer.scrollLeft >= sContent.clientWidth) {
          refScrollX.current = 0;
          sContainer.scrollLeft = 0;
        }
      }
    }, []),
  );
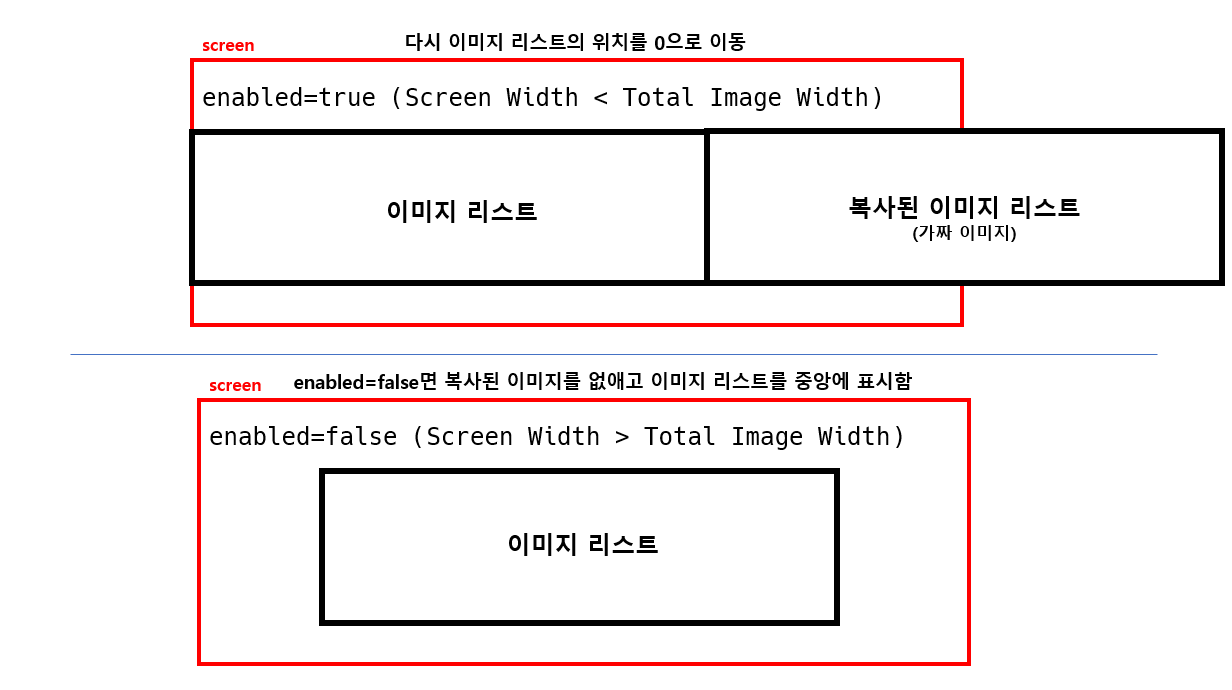
이후에는 enabled일 경우에는 이미지를 계속 0.5만큼 좌측으로 이동을 시킵니다. 그러다가 만약에 이미지가 전부 밖으로 나가면 위치를 다시 0으로 바꿔줍니다.
1
2
3
4
5
6
7
8
9
10
11
12
13
14
15
16
17
18
19
20
21
  return (
    <SliderContainer ref={refSliderContainer}>
      <SliderArea
        className="logo-slider"
        style=
      >
        <LogoArea ref={refItemArea}>
          {logos.map((src) => (
            <Slide key={`${src}-main`} src={src} />
          ))}
        </LogoArea>
        {enabled ? (
          <LogoArea>
            {logos.map((src) => (
              <Slide key={`${src}-append`} src={src} />
            ))}
          </LogoArea>
        ) : null}
      </SliderArea>
    </SliderContainer>
  );
그리고 만약에 enabled일 때는 동일한 이미지들을 한 번 더 오른쪽에 생성하고(가짜 이미지) 아닐 때는 진짜 이미지만 표시합니다. 이 부분을 그림으로 설명하면 아래와 같습니다.
이미지 설명